UPDATE, 2026: Everything in this post is outdated now! Blender now has native HDR support and none of this is necessary or useful any more. Yay! Visit the official docs here for more info: https://docs.blender.org/manual/en/latest/render/color_management/displays_views.html
Note that HDR AVIF requires 5.2+ which is only available in nightlies (buildbot) at the time of this writing. Blender 5.0 and 5.1 don't really have a good way to write HDR still images, at least not in a lightweight and widely support format.
Original post preserved below for posterity:
---
If you try and figure out if its possible to save your Blender project for HDR displays, you'll likely get some well meaning people explaining to you that you don't have to do anything because Blender always renders in 32bit high dynamic range. That's great, and will be essential for this, really. But your HDR TV or YouTube's HDR encoder do not want scene-referred fp32 values, and there's a good number of steps in converting that data to something they do want. Alternately, you might get some equally well meaning people telling you "do whatever specs your colorist asked for". That's a solid plan if you're making a show in HDR for Netflix. It is tremendously unhelpful if you are making a 10sec clip and want to watch it on your nice OLED TV.
What I hope to explain in this post, is how to get from the point of having a ready-to-render animation, to having a fully encoded and tagged HDR10 file you can play on your TV, HDR PC monitor, or upload to YouTube to play in HDR.
Some important points to keep in mind:
- For the sake of simplicity and keeping to my own experience, this post will focus on exporting an animation from Blender+Cycles, for HDR10 PQ for YouTube and Plex/VLC. If you are using another render engine (Eevee, Octane, PRman, etc) or another DCC (Maya, Houdini, etc) most of this is still applicable. The 3D side is largely universal, so the Blender/Cycles specific parts will mostly be "where the button is located" stuff.
- MOST of the 3D-side stuff is the same for Dolby Vision AFAIK. However, if this show has a Dolby Vision setup, the person pushing the buttons in the 3D lighting software is probably not the same person who is going to do the master. And those editors and colorists hopefully DID give you exact specifications on what formats they want the footage in. So the advice of "just do what your colorist asks for" is probably best.
- There is not yet a widely agreed upon format for HDR still images. There have been a number of proposed ways to do it, but as of summer 2020 there is no widely available and standardized way to save or view a still image in HDR. Sorry, animations only. I hate it too.
Let's get started then, shall we?
If you're not already familiar with how HDR video works, this is an excellent primer. The good news is, modern renderers including Cycles all work with a scene-referred 32bit framebuffer. It's important to remember that scene-referred is NOT "HDR", it is not yet SDR nor HDR, it is scene-referred. It is raw material that can be made into either one. Yes, it has a lot of dynamic range. But HDR video is an output-referred format! Because, you know, its for output devices, aka TVs. When we convert scene-referred renders for SDR, we're fitting the data to the sRGB transfer curve and sRGB color space for display on our sRGB devices.
So what do we need to do to get our scene-referred render ready into an HDR video?
- Fit the linear scene-referred data onto the perceptual quantizer curve
- Convert the color space to Rec2020
- Convert from fp32/fp16 to int10
- Set the HDR metadata so our player knows it's HDR
We have a bit of a problem here. Blender cannot do any of these out of the box. The first 2 can be added by using ACES instead of the stock OpenColorIO config. The last 2 are not fixable, unfortunately. So we are going to have to get a bit of help from Hybrid (or FFMPEG) to finish the job.
Setting Up
The easiest way to do this is to simply work in ACES for the entire project. If you do not want to do that, or if this is an old project you're trying to remaster, you CAN just bring ACES in for the final export. You will need to have all of your footage saved to OpenEXR sequences first, and remember your result will be limited to the Rec709 gamut if you haven't used ACES for the entire project.
Assuming you DO want to use ACES throughout your project, you can find some excellent resources for using ACES in Blender here
While working on your scene, leave your output device transform set to the one that corresponds to your monitor, most likely sRGB. (for some setups, P3D65 or Rec709 may be more appropriate). We are only going to use the HDR ODT at the very last step.
Lighting the Scene
Remember that what you see through the sRGB ODT is not necessarily reflective of what the final HDR output will be. Particularly, you should know that there will be very little clipping in the final HDR video. Most things you see clipped to white or lost in the glare in sRGB? They're going to be perfectly visible in HDR, just really, really bright. Keep this in mind while working on your lights and materials. If you need to check how bright areas will behave under HDR, you can change your output device to "Rec. 2020 ST2084 1000 nits"(see below) to verify. The result will be very washed out, but you can see what detail will be preserved under HDR. Lighting without a live HDR preview is not optimal, but it's all we have to work with at the moment.
If you have never worked with ACES before, you should take some time to get used how the output transform behaves. If you are used to working with Filmic Blender, the basic behavior should be familiar to you. Keep in mind that ACES does not use the same formula though. Most importantly, the film-like curve is applied in a very wide gamut, and there is no output gamut mapping. Brightly saturated highlights may still hue shift under ACES, which generally does not happen with Filmic Blender. And again, remember that most highlight clipping behaviors you see are specific to the sRGB output device that you are previewing with, you may not see them in your HDR version! For example, a bright blue object may become a pale blue under Filmic Blender, and a whitish-cyan under ACES sRGB. However, under ACES HDR, it is neither. It's still bright blue, just eye-meltingly intense.
In HDR, you have a huge amount of space for highlights. The appearance of bright areas in your image is where you will notice the biggest difference, although you will have additional shadow detail and color gamut to work with as well. HDR will also quickly highlight things that relied on the sRGB gamma curve to look like they were supposed to, or on using display-referred math. If you have been working under Filmic Blender or ACES for awhile, you already know the drill. 1.0 is not "white", don't use "screen" in comp, don't rely on the display clipping to add different hues to your flame FX, etc. If you thought ACES/Filmic for SDR caused these things to bite you in the ass, you haven't seen anything yet.
Rendering
When working with HDR, it is very important to keep all your scene-referred data present until the very end. Only render to OpenEXR files until you are ready to export the final printmaster of your entire animation. Blender does not apply your color management output settings to OpenEXR files (nor should it), so your ACES sRGB transform will not be baked in.
If you are only rendering a single clip directly from the file you made it in, follow the setup in the next section, "saving the printmaster"
Otherwise, render to OpenEXR files to move them on to other Blender files for compositing or the VSE. When loading OpenEXR files that have been saved under ACES, use the input color space "ACEScg". For EXRs that have been saved using the stock Blender config, use "Utility - Linear sRGB". The latter can be used to take older existing animations and re-master them in HDR!
Preparing the Printmaster
Whether it's straight out of the renderer, a complicated movie put together in the VSE, or just some compositor effects on a single clip, one way or another you are now at the step where you can push "render animation" and your complete movie will be spit out. We're going to cross into display-referred land now.
We first need to change our output transform from the ACES sRGB ODT to one of the HDR ODTs. For YouTube and typical consumer HDR displays, you want ST2084/PQ with Rec2020 primaries and a 1000nit limit. So select the output transform "Rec. 2020 ST2084 1000 nits". (if you want to use the 2000nit or 4000nit versions you can, but make sure you set MaxCLL to match, see next section).
Your color management panel should look like this:
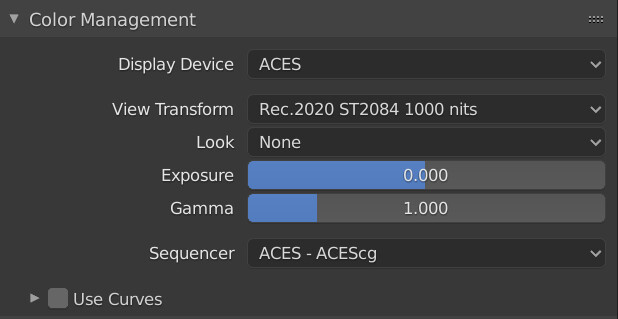
Blender does not support any sort of 10bit or 12bit video format, so we're going to have to rely on good ol' TIFF to get our finished output to our encoder.

Note that color depth is set to 16bit, not 8! HDR10 is not an 8bit format (hence the name) so we can't be feeding our encoder 8bit source footage.
Ok, go hit the "render animation" button
Encoding and Metadata
You should now have a TIFF sequence of your entire movie, with the pixel data properly formatted for HDR10. It's not quite a useable HDR video yet though, we need to get it into a movie file and put the HDR metadata tags in. There are a number of tools that can do this, including Hybrid, Staxrip, Adobe Media Encoder, and of course, command-line FFMPEG for the hardcore among us. The rest of this section will be using Hybrid.
Import your TIFFs:

Set your video encoder to x265. If you have audio that you've rendered separately, select it in the audio tab now. Adjust any encoder preferences you like, but the defaults are fine in many cases with x265

Now the fun part, go to x265 > Signaling. Check the boxes to tag Primaries, Matrix, and Transfer, and uncheck "to input" to allow you to set them manually. (We did not set them previously since Blender can't do that, so it won't guess them correctly). Set them as follows:
- Primaries: bt2020
- Matrix: bt2020nc
- Transfer: smpte2084
Next, check the box labeled "Light Level", this will also automatically check the "HDR" box and set the base HDR10 flags. Enter the values for MaxCLL and MaxFALL. MaxCLL (Max Content Light Level) was formatted for us by our ODT earlier. If you used the "Rec. 2020 ST2084 1000 nits" ODT, enter "1000" for MaxCLL. If you used the 2000nit version, enter 2000, etc.
MaxFALL (Max Frame Average Light Level) is trickier. In an ideal world we had a plan with MaxFALL throughout grading and have a measured average value to use here. But we're all too poor for that, so....just pick some arbitrary number. 200nits is probably in the right ballpark. The signaling tab should look like this when you're done:

Don't worry about the other fields, we don't actually have any real data to specify for those so leave them blank.
Start your encode!
The Finished Product
If you did all this right you should now have an H.265 HDR10 video file! The resulting file should be available for HDR playback when uploaded to YouTube, and can play on HDR aware local devices such as your computer via VLC, your Plex server, or loaded onto a thumb drive and plugged into your TV.
Making HDR content without a proper monitoring setup is difficult, and I don't recommend using the setup here for anything too serious. If you are interested in making a more polished product in HDR, you should be finishing in a tool such as Resolve. You can load your ACEScg OpenEXR sequences as footage there as well, and can preview on an HDR monitoring display.
However, if you've made some quick animation clips and want to watch them on your HDR display and share with friends, the method here is a good way to go about that without spending a bunch of money on Resolve Studio, extra TVs, and Decklink cards. It's also a great way to dip your toe in the water of HDR, and I've found I understood HDR as a format much better once I had made a few silly clips with it.
You can view a video I made with this method here:
Have fun!